Vodka Gummy Bears

So I’ve been really busy lately. You know how sometimes life just piles up on you? And then its been almost two weeks since your last blog post and you start feeling super guilty? Yep, that’s me right now! I am so determined to make time for this blog, as I’m enjoying writing it so much, but sometimes time just slips away! I also have difficulty figuring out what recipes to try when I’m a little more time poor, and as a result tend to go back to basic recipes in my arsenal, which was sort of why I started this blog in the first place!

Anyway, for a party I had a couple of weeks ago, I decided to try a recipe that I had pinned a long time ago, but never tried! And I realised that I hadn’t blogged about it, so I feel like it presents a perfect opportunity. I feel like there were enough people at the party interested in how I made this recipe that it might be useful to the entire internet, and worthy of a blog post.

Enter Vodka Gummy Bears. Those party treats that you don’t often get, and seem like they would be more difficult than they actually are. I’m not much of a vodka drinker myself (I had a few too many experiences with it when I was 18, and as a result let’s just say I can’t smell it without gagging), but I figured that gummy bears have the potential to make anything taste better. And what is more fun for a party then cute little bears filled to the brim with alcohol?

These were surprisingly easy to make, but you do need to make them ahead of time to ensure there is enough time for the vodka to seep into the gummy bears. I’m not sure of the science, but allegedly gummy bears will soak up whatever liquid you put them in. I didn’t test this fully, but I feel like this means however strong you want them, they will take it. Mine were really strong, maybe a little too strong for some, but they were delicious!

Vodka Gummy Bears

Vodka Gummy Bears

Adapted from Mix That Drink

Serves: However many gummy bears are in the packet. I did one packet for a party of 20, and that was enough for everyone to have multiple

Preparation Time: 2 minutes, if that

Cooking Time: No cooking involved, but you need 3 days for them to sit

Ingredients

  • One Packet of Gummy Bears – I used Haribo ones because they are delicious. I read somewhere that sugar free gummy bears work really well too
  • Vodka – You won’t need too much, about a third of the bottle.
  • One glass jar – do not use plastic as apparently the vodka messes with it, and the result is not very nice.

Method

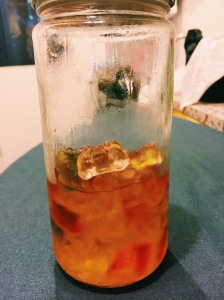
  1. Open the gummy bears and pour into the glass jar. Like so: Vodka Gummy Bears

  2. Get your vodka and pour over the top of the gummy bears until the bears are entirely covered.Vodka Gummy Bears
  3. Cover the gummy bears with a lid and place in the fridge for 24 hours.
  4. After 24 hours, get the gummy bears out and stir them to ensure that they don’t get too stuck together. I found after 24 hours they were turning into a gelatinous pool of vodka and sugar, so it is best to move them around to ensure they keep their bear shape. Place back in the fridge for another 24 hours or so.Vodka Gummy Bears
  5. Keep getting them out every now and then, and stirring them. You will notice each time you do the liquid disappears and the gummy bears become bigger as they soak it up.
  6. After about 3 days, get the gummy bears out of the fridge, and pour into a bowl to serve. I found this to be the easiest way to serve them, as they are quite wet despite soaking up the alcohol.Vodka Gummy Bears
  7. In between serving, place in the fridge every now and then to ensure they don’t melt. I found mine needed about 15 minutes in the fridge here and there to avoid melting, as they were quite wet. Once I did this they firmed up nicely.

And there you have it, simple steps to a delicious alcoholic treat. They looked great in the end – they did keep their bear shape really well, and they maintained the different flavours, despite having a strong vodka kick. One of my friends, who has never had a drink, almost ate one because they looked so good. I managed to catch him and inform him of the alcohol content before he ate one, phew! But hopefully you can have the same amount of success if you try to make these, they are easier than they appear, I promise!

I also promise that next post will be something more substantial! Maybe a little sweet treat to get me through the working week, who knows?

Until next time

Ella xx

The OTT Birthday Cake

The OTT Birthday Cake 18

It was my birthday last week and I tried to turn it into a weeklong celebration with large success. I managed to space my actual birthday, a trip away and my birthday party out enough that it felt like it just kept going. Normally I prefer to celebrate other people’s birthdays more, as I find I always put too much pressure on my own birthday to be a super special day. But this year I had a lovely day and was determined to throw myself a really nice party. And with birthday parties must always come a kick ass birthday cake. Multiple people said its not right to make yourself a birthday cake, that it’s a little sad. Many offered to make one for me, or to buy one instead. But I felt this was a perfect opportunity to try out one of the many crazy cakes that can be found on Pinterest.

I don’t know about everyone else, but I find that Pinterest is full of recipes for cakes, which look like something that I will never be able to humanly achieve, or eat and not die from a cardiac arrest. These are the sorts of recipes that wind up on those lists that Buzzfeed do of the expectation vs reality of Pinterest recipes. You go into it thinking “oh yeah, its just a cake, how hard can it be?” and wind up rocking back and forth in the corner. And I’ve tried to make cakes from Pinterest before and had epic failures, so I was a little hesitant to try again. But I felt that this would be the perfect opportunity to give it another go, and make myself the cake of my dreams.

The cake in question combines two of my favourite things: Chocolate and peanut butter. I just think this is a match made in heaven, as peanut butter is just about the best thing ever invented. If I could eat it all day, and not become the size of a house, I totally would. So when I asked myself what cake I should make, this one was the obvious choice.

Now, upon first glance this cake might appear to be very terrifying and the thought of trying to make it could make you shudder with fear. But it was surprisingly easy. I would actually use the cake recipe again, as it was super easy and made a delicious, light, chocolate cake. Put that together with the glorious peanut butter icing, and you have an impressive looking, but relatively simple cake. You just need to take the time to do it right; it is not a rush job. Love the cake recipe and it will love you back, in the form of an amazing cake.

I could have made it even prettier, as unlike the recipe I used, I did not do a ganache topping over the top, as I just felt it was already a pretty full on cake. But you could do this if you wanted to. Completely up to you and your obsession for chocolate.

My mum and dad tried some of this cake and called it the over the top (OTT) birthday cake. I told them that they had come up with the perfect name for the cake. It was a little over the top, but when you are making your dream birthday cake, you need to go all out.

The OTT Birthday Cake (Chocolate Peanut Butter Layer Cake)

Adapted from Lemon Sugar

Preperation Time: 45-60 minutes

Cook Time: 35 minutes

Assembly Time: 60 minutes

Serves: 20-25 pieces

Ingredients

Chocolate Cake

  • 3 cups of Caster Sugar
  • 2 2/3 cups of plain flour
  • 1 1/3 cups cocoa powder
  • 2 ¼ teaspoons of baking powder
  • 2 ¼ teaspoons of baking soda
  • 1 ½ teaspoons of salt
  • 3 medium sized eggs
  • 1 ½ cups of milk
  • ¾ cup of rice bran or vegetable oil
  • 1 tablespoon of vanilla extract
  • 1 ½ cups of boiling water

Glorious Peanut Butter Icing

  • 250 grams of unsalted butter at room temperature,
  • 250 grams (or 1 box) of cream cheese at room temperature
  • 1 teaspoon of vanilla extract
  • 1 ¼ cup of smooth peanut butter
  • 4 cups of icing sugar
  • ¼ cup of heavy cream

Garnish

  • Peanut flavoured candy of your choice (Reece’s pieces would be the obvious choice, but these are hard to come by in Australia. So I used some little peanut butter caramel chocolates instead)

Directions

For the Cake:

  1. Preheat the oven to 180 degrees (350 degrees F)
  2. Prepare three pans of roughly the same size (mine were slightly off each other, but relatively similar – you can always make it even with icing later) – here’s a tip my mum taught me with preparing cake pans. If you are using one where the bottom doesn’t come out, butter the whole pan. Then fold two pieces of foil into two long strips. Place these in the bottom of the pan so that they cross and have bits of the strip hanging out of the pan. Fold these down and place a circle of baking paper over the top of these in the bottom of the tin. When it comes time to remove the cake, you will be able to use the foil to lift the cake out of the tin with ease.OTT Birthday Cake 2OTT Birthday Cake 3
  3. In a very large mixing bowl, combine the sugar, flour, cocoa, baking powder, baking soda, salt, eggs, milk, oil and vanilla.
  4. Using a hand mixer, beat the ingredients until just combine (don’t overdo it in this step, just make sure that the batter comes together and the lumps have started to dissolve).
  5. Add the boiling water and beat the mixture again until combine and smooth. Then, use a spatula to push the mixture on the side of the bowl into the batter, and mix again. It should look similar to the below:OTT Birthday Cake 4
  6. Evenly distribute the mixture into the 3 cake tins. I used a soup ladle to do this as I could evenly measure how many scoops went into each pan. Here’s my finished product:OTT Birthday Cake 5
  7. Bake for 30-40 minutes until a skewer comes out clean. I put them in for 30 minutes and then tested each 2 minutes after that until I got this result. It ended up taking me about 40 minutes.
  8. Cool the cakes on a wire wrack for 15 minutes, then remove the cakes from their pans to cool completely.

Glorious Peanut Butter Icing

  1. In a large bowl, beat the butter until it is light and fluffy, about 3 minutes.OTT Birthday Cake 6
  2. Add the cream cheese, and beat this with the butter until smooth and creamy.
  3. I had to take a shot of the before and after of my peanut butter jar, because there is nothing more perfect than an unopened peanut butter jar, wouldn’t you agree?OTT Birthday Cake 7 OTT Birthday Cake 8
  4. After marvelling at the glorious peanut butter add this and the vanilla to the mixture, and beat until incorporated with the cream cheese and butter. Use a spatula to push any excess from the sides of the bowl into the mixture, and mix again until completely incorporated.OTT Birthday Cake 9
  5. Add icing sugar and the heavy cream, and beat until this is fully incorporated and the icing is smooth and creamy. Here is how mine looked at the end, in all its glory (this is some of the best icing I’ve ever eaten. It took all my power not to eat the whole bowl):OTT Birthday Cake 10

Assembly

  1. Once the cakes are cool, place the first cake on a nice big plate.
  2. Using an offset spatula, or a cake-decorating tool of your choice, smooth about a cup of icing onto the top of the cake.OTT Birthday Cake 11
  3. Add the second layer of cake on top of this icing, and put another cup of icing on the top of this layer.OTT Birthday Cake 12 OTT Birthday Cake 13
  4. Add the final layer to the cake, and smooth icing over the top. At this stage I put the cake in the fridge to set, as it was feeling a little precarious, so I didn’t want to leave it out any longer. I left the cake in the fridge for about 30 minutes. Here is how mine looked while icing the last tier:OTT Birthday Cake 14
  5. Once set, get the cake out of the fridge. With the remaining icing, ice the sides of the cake, ensuring that you fill in any differences in size between the cakes to make the whole surface even. Smooth over with a spatula once done, and place back in the fridge until you are ready to serve. Here is how mine looked at the end:OTT Birthday Cake 15
  6. When ready, get the cake out of the fridge. Cover with a peanut butter candy of your choice for garnish.OTT Birthday Cake 16

And there you have it! Its not as difficult as it initially looks. I am proud of myself for finally trying a delicious Pinterest cake, and I honestly couldn’t have asked for a more delicious cake for my birthday! I had people texting me after the party asking if I had leftovers, they loved it so much! Although it’s not the healthiest cake you could ever make, it was so delicious you just don’t care. It was totally worth every calorie of every bite, I swear this cake was happiness in a dessert.OTT Birthday Cake 19

Let me know if you make this cake, or what your dream birthday cake would be!

Happy Cooking!

Ella xx

Zucchini and Haloumi Fritters

Zucchini and Haloumi Fritters

On the weekend, we had my sisters 21st birthday party. 93 people, at our family home, and my mum decided to cater the whole thing! Most people would have a fit over something like this, but my mum was determined to organise the whole thing. I think my love of food and cooking must come from her, because she seemed to really enjoy the whole process, as much as it was quite stressful. I decided to give her my help in the kitchen over the weekend, and although most of my help came in the form of browning off meat, frying bits and pieces and pitching in here and there, I did get responsibility over one recipe.

You wouldn’t think much of Zucchini and Haloumi fritters. Unless you are me, as I think that haloumi is God’s gift to man. If I could eat haloumi every day for the rest of my life, and not get fat, I would do it. But alas it must be saved for special occasions. When I saw this recipe for Zucchini and Haloumi fritters, I figured they would be a great canapé to serve at the party. Not only were they super simple to make; they were perfect for Vegetarians and meat eaters alike.

The recipe from Taste was a good one, but I did make some modifications based on what we had. I also managed to make them gluten free, which meant my sister could actually eat them. The recipe below was also for a large batch, about 50 fritters. Before you question the amount we made, these were by far one of the most popular canapés we served at the party, so perhaps making a few extra is not such a bad thing. Plus you will want leftovers of these bad boys.

Zucchini and Haloumi Fritters

Adapted from Taste.com.au

Preparation Time: 40 minutes (30 if you have a food processor)

Cook Time: 25 minutes

Serves: 50 bite-sized fritters

Ingredients

  • 600 grams of Zucchini (4 big zucchinis, or about 10 little ones)
  • 2 onions(It doesn’t matter what type, I used both)
  • 500 grams of haloumi cheese
  • 4 teapsoons of lemon rind
  • 4 eggs,
  • 2 tablespoons of finely chopped parsley (the recipe called for dill, but I don’t really like it. Plus we only had parsley, so I had to improvise!)
  • Olive oil, for frying
  • To serve: relish or aioli of your choice

Method

  1. Grate the zucchini’s. I did this in a food processor to make it really quick, and I think this is the easiest way to do it. If you don’t have a food processor, simply grate with a hand grater.
  2. Put the grated zucchini in a bowl and set aside for about 15 minutes to let the liquid start to seep out. You need the zucchini to have as little liquid as possible in it, so the longer you leave it the better, as this helps the zucchini to release this.
  3. Next, grate your haloumi and onion. I did this in the food processor and finely chopped the pieces that didn’t grate. You could again use a hand held grater if you don’t have a food processor. Zucchini and Haloumi Fritters
  4. Squeeze the zucchini in order to remove the remaining moisture. I am sure there is a better way to do this, but I grabbed small handfuls of the mixture and squeezed it between my hands over the sink. You would be surprised how effective this is – I managed to get most of the liquid out. Transfer this to the processor bowl.
  5. Move the zucchini, haloumi and onion mixture into a large mixing bowl. Add in the flour, lemon rind, eggs and parsley. I then added a pinch of salt and a generous serving of pepper. Stir to combine; making sure it is really well mixed.Zucchini and Haloumi Fritters
  6. Form the mixture into small bite-sized patties. Set on a tray and refrigerate for about 30 minutes to get them firmed up.Zucchini and Haloumi Fritters
  7. Heat a generous amount of oil in the frying pan. Frying in batches, place a few of the fritters in the fry pan, frying on one side for 1-2 minutes, or until golden. Turn over with a spatula and cook on the other side for another 1-2 minutes, or until golden. Once cooked, place on some paper towel to drain.Zucchini and Haloumi Fritters

Once I had cooked these it was easy to store them until the party, where we reheated them in the oven. We served them with a dollop of tomato relish on top, which was absolutely delicious! You could do the same, or serve them with an aioli, as suggested by the original recipe. I think these are the perfect vehicle for a number of toppings, or even just to eat on their own! They were really delicious, and were one of the only canapés we served at the 21st that we didn’t have leftovers of. I think the results speak for themselves!Zucchini and Haloumi Fritters

Let me know in the comments below if you are thinking of trying this recipe for your next party, and what you would serve them with! I will definitely be trying these ones again!